Thursday 26 September 2013

Rubberband + Neck?

I was in need of a DIY therapy. Saw a DIY rubber necklace from Rag to Couture's website. And I decided to get my hands on it. It looked very simple and easy to do, so that's why I took the challenge. Hehehehehe! Plus I needed a necklace to wear for that day. Got kinda bored with my old necklaces. Plus I couldn't bring all my jewelry from Malaysia to Shanghai. Because if I do, it'll be a luggage of it's own. Couldn't afford to beg my husband to pay for the extra luggage. I didn't have the heart too. He has done enough for me.

I don't know if I have given enough photo tutorial for you guys to see or have an idea of how to do it, but please check out Rags to Couture page for more detail. I used red & green for my tutorial, but I actually made mine in mustard color. Hehehehehehehe! Hope you guys understand my instructions.

I didn't follow 100% step by step from Rags to Couture tutorial. I changed a bit for the hooking part of the necklace. She uses a jump ring to close the 2 ends, but I used a paperclip to attach both ends. And I also used a lot of single loop, where I knot it (Green Rubber) more than the double loop (Red Rubber) which I only wanted enough to show it at my chest area. Reason being was, I didn't want to have more (Red Rubber) double loop near my neck's skin area cause afraid that it will give me rashes. So hoping that the single knot would do me justice. And so far, it did. :)

To start off, take 2 (Red) rubber band & pinched it. Use a single (Green) rubber band &
knot it around the double (Red) band. Pull (Green) band tight.
Pinch the (Red) band loop & insert 2 new (Red) band. Repeat for 21 times with the
(Red) band. Or till how long or short you want it to be. 
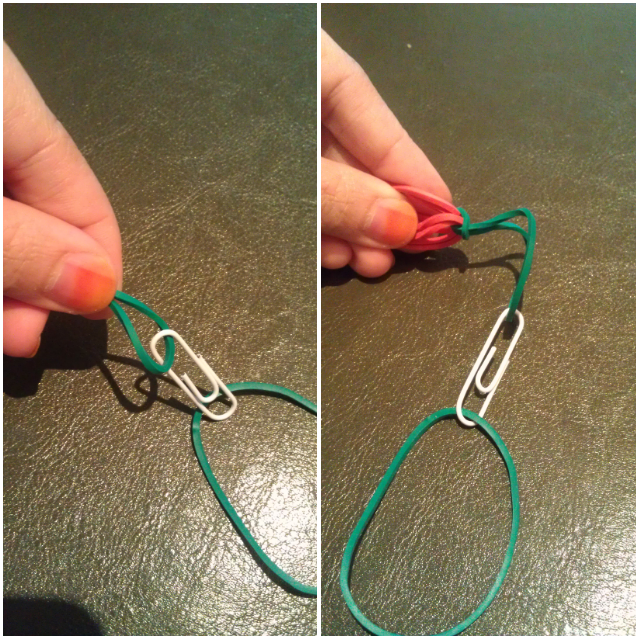
Use a paper clip to attach both ends. If you have a jump ring, it would be great too. Done!
I made one earlier in Mustard & Blue. And notice the single knot (Blue rubber band) used
for a longer necklace. And away from irritating my neck. :P

Good luck guys! And big THANK YOU to Madeleine (owner of Rags to Couture's blog) for inspiring me & my boring life. Now I have a new quirky necklace to fashion up my neck & chest! Jyeah! Hehehehehehehehehe!

Quick Fix-sion

I wanted a quick fix accessory  that day, and I didn't want to put on a necklace. So, was rumbling through my jewelry box and found them earrings I bought from H&M! And bam! It hit me. Why don't I just insert the earrings (or a piece) through the buttons of my shirt that I'm wearing that day. Brilliant! 

I wear the Hijab, so kinda useless that I bought a pair of earrings (my husband thinks so). BUT...! I can't help it! It was so cheap when I bought them that time. Aaaand... I did have something else in my mind with them earrings but haven't got my tools to DIY it. -Yet. *cough*
The earrings that I choose is so rugged yet stylish, so it was perfect fit to "chic-up" for my outfit of that day. Hehehehehe. Just a simple touch to help a women boost their confidence. Who needs necklaces or neck collar jewelry. Cheap, easy & pretty!  :)
Below is a picture for the simple DIY instruction.
1. Choose your desired earrings. You only need 1 pair.


2. Wear an outfit that have buttons, for easy insert for the earring stud.
3. Insert the earring's stud into one of the button's hole-through.
4. Use the earring back to secure your earring from falling.
5. Voila! You're ready to go out, girl!!
  

Eye See.

Photos are taken by me using my HTC Sense. All photos are non filtered. Not bad for an amateur like me. Hehehehehehe! *tap tap my own back*

I won't say I love living in Shanghai. Well, I love that we are living abroad to be able to learn, experience, see & embrace what's in front of us. Shanghai is gorgeous. The city, landscape & architecture is beautiful. I won't deny that. But sadly, the people is the let down here. They say Shanghai-nese locals are educated and well behaved, but those non-locals from other parts of China province area, are the ones that's making Shanghai a let down for tourist. With all the spitting, peeing, shitting, farting, talking loudly, screaming, arguing, bad tempered, pushing, do not follow the rules and regulation from road to pedestrian, to lining up at the restaurants & many many many more to list. Like what everyone else is saying, "Only in China!" Hahahahahahahahaha!

But despite the bad side of living in China, I have captured the total opposite of it. And I'm glad I am able to have memories taken just by using my "not-so-canggih" phone. So here it is. Shanghai at it's best. Enjoy. 

All photos taken are property of mrsbubblesanawqi.blogspot.com
Sunset seen at the Binjiang Avenue. Weather was kinda hazy though
2 days before the Typhoon Haikui hit parts of Shanghai.
All photos taken are property of mrsbubblesanawqi.blogspot.com
Silhouette of the architecture's roof at the famous Yu Garden. 
All photos taken are property of mrsbubblesanawqi.blogspot.com
Sun setting behind the famous iconic building, The Pearl Tower.
All photos taken are property of mrsbubblesanawqi.blogspot.com
Reflective ray light hits the staineless steel structure of
the Jin Mao Tower. 
All photos taken are property of mrsbubblesanawqi.blogspot.com
It was a good weather that day, sunny & cloudy at the same time.
Breezy & cool too. Walking along The Bund area, Zhongshan (E) 1st Rd.
All photos taken are property of mrsbubblesanawqi.blogspot.com
View captured from our home. Maghrib time. SubhanAllah. This is at Pudong (S) Rd.
Near the Taitongzhan Ferry station.
All photos taken are property of mrsbubblesanawqi.blogspot.com
This happened after Shanghai got hit by the Typhoon Haikui. Traffic got congested 
as some of the areas were flooded, therefore schedules are delayed & everything 
was chaotic. We got stuck outside from 3pm & came home only at 10pm. 
Couldn't get a taxi, subway was full & even if we use the bus, the traffic 
was really bad that we rather walk home from Pujian Rd to Pudong (S) Rd! 
All photos taken are property of mrsbubblesanawqi.blogspot.com
Another beautiful scene from our home. While we were walking down, we witness this.
Masyaa'Allah!
All photos taken are property of mrsbubblesanawqi.blogspot.com
Night life in Puxi area. It was almost 12am, but that day Shanghai was having a
Mid Autumn Festival, therefore there were many people chilling outside.
Plus weather was heaven!

Durian Gravy ala Shortcut.


Eat your durian gravy with bread or even sticky rice. Delish! Enjoy!
This is a dessert. I made this dessert with just 2 cloves of Durian & the rest is magic. Here in Shanghai, Durian is freaking expensive! But that day, I was craving for it so much that my husband bought some for me. Some as in 2-3 cloves only for freaking CNY63! Hahahahahaha! I was so happy, that my taste bud was like, giving me all this delicious, excellent, and to die for thoughts. The smell was calling me & I took a bite. And that one bite made me disappointed. It was almost rotten. Not THAT rotten, but it wasn't a the Durian taste that I wanted. HAHAHAHAHAH! I'm such a DIVA! Below are the ingredients. Don't ask me about measurements, cause I measure by eye. I see & then I taste. Oh, btw, this is a shortcut method to make Durian gravy. The fastest way & easiest I have ever done. 2-3 cloves of durian only! 


Ingredients ala Shortcut :
1. A can of Coconut Milk/Cream
2. Sugar & Salt for taste
3. Pandan leaf (I used 2-3 for smell & flavour)
4. 2-3 ulas (cloves) Durian (Cause thats all I have left)
5. Dodol (sweet toffee-like confection)


(*photos above are all taken via Google Image Search. Would like to thank them for providing the images. Forgive me if I took your photos without permission.)

Directions:
1. Pour in coconut milk in a pot. Put in knotted Pandan leaves. Wait till slightly boiled. Then add in Dodol.
2. Keep stirring & till combined cause the Dodol will take a longer time to melt.
3. Then add in Durian (together with pit & all)
4. Add in the sugar for taste. Dash some salt too.
5. Done!

Who would know if  it's made from Dodol & not 100% durian.
Taste just the same! :)

PS: The whole wheat loaf was made by my baker husband, by the way. Healthy versus Nasty. kih kih kih!

Green Updates.

Finally we are home from the long holiday. And guess what. My green's are dying. *sob sob sob* Well, not all. Some still survived. Some are at the verge of dying. Just look at them photos. Poor, poor, poor Mr. Basil, Mrs. Minty & Uncle Lemongrass.

Before & After : My basil.

This is too funny. I have no idea how, but my Lemongrass died & there was my chili leaves coming out! Must've been accidentally drop some chili seeds in there. 


And above is my basil, before/after wilting & at their death bed. *sob sob* Yes you guys can survive! Don't die on me! Dammit! Wake up! Wake up! (Drama of the day. LOL!) Well, I hope I managed to safe them from their death. Lets see how they are in few weeks time. Crossing my fingers & loads of praying.

Wednesday 25 September 2013

Quinoa ala Malaysian Twist

This looks so sinful! Plate your food in such a way, because you DO eat first with your eyes!
Lunch today. I made Quinoa goreng sambal. We bought the quinoa from Malaysia. All the way, I tell you! Maybe because I haven't found any yet over here in Shanghai. Well, I did get some information from Foursquare that there's this particular shop where this Chinese lady sells international products such as grains, branded chocolates, cheese, cereals, herbs & others. And quinoa was one of it. But, still, I haven't got the opportunity to recce it. Her shop is at 274, Wulumuqi Rd (M) at Wuyuan Rd, Puxie area. 

I was inspired by a friend of mine. She's a Yoga instructor and a VERY healthy eating Guruji herself. She even have her own healthy menu meal (Lunch only, from Mon-Friday) for those who wants to eat healthy but haven't got the time to make one or have no clue on how to make one. Hehehehehe. You can order your food of choice a day before, and it's either you pick it up at her place or they do delivery, but to certain area with a certain amount of orders. Check out her Facebook page, EatCleanKL for more info. You can even follow her EatCleanKL_IG on Instagram. 

Anyways, back to my lunch today. Here's a picture of it. Looks delicious, no? And it taste good too. Approved by my beloved husband himself. I was afraid he wont eat it, but he end up having a second helping. A bowl of quinoa is filling I tell you. I even added smoked salmon & avocados as sides, and yet, my husband is still hungry. The poor guy must've been working damn hard in his bakery kitchen.

How to cook Quinoa? Simple. Just use the ratio of 1:2. A cup of quinoa to 2 cups of water. I wanted to give a bit of flavour to the quinoa, so instead of just water, I used my home made chicken stock (chicken, chopped onions & ginger) & added a dash of salt to taste. So the usual way you cook rice in a pot, that's the same way you cook quinoa too. Or if you have a rice cooker, well then, that's easy-peasy for you! 

Cooked quinoa should look fluffy, a little translucent & you can see the spiral sprouting out. 
Let the quinoa rest. In the meantime, start your nasi goreng paste & vegetables. I used diced capsicum, carrots & bak choy for colour & crunch too. And since I love onions, I put a lot. Bad odor for them armpits, but good for them hearts. For the nasi goreng paste, I just blended some shallots, garlic, chili, toasted belacan, sugar & salt. If you are very, very, very lazy, go grab some instant paste from the grocery shop. Hehehehehehehehe...

Ingredients

Nasi Goreng Paste (blend all) :-
1. Some shallots (the more you have them, the sweeter the paste is)
2. Garlic
3. 2-3 Fresh Chilies (or Dried chillies are the best. Soaked them in hot water for few hours or boiled it, then blend)
4. Toasted shrimp paste (Belacan)
5. Sugar & Salt to taste.

Others:-
1. Capsicum
2. Carrots
3. Onions
4. Smoked Salmon
5. Avocados
6. Cooked Quinoa (I bought Organic brown/white Quinoa)

Heat up your wok, wait till hot before pouring some olive oil/vegetable oil. I like to saute & caramelized the onions. And I like to cook the carrot first too so. It's up to you which ingredients you want to put in first. It's nasi goreng, anyways! LOL! 


So once my onions & carrot looks caramelized & cooked, I pour the paste in. Cook till oil separates (so to make sure your chillies are cooked well, if not you'll get the tummy ache) Once you can see them oil separates, add the capsicum, & crack an egg if you like. Then add the quinoa & greens (put in last, so you will still have the crunch & Vits from the greens. 

Voila! Quinoa Goreng ala Malaysia. Enjoy your healthy lunch. See, there's loads of substitute for rice. We both love it very much. Thanks EatCleanKL! 


Tuesday 10 September 2013

Fusion Mexico.

Andale! Andale! Arriba! Arriba! Heheheheheheheh!

This is a very simple, quick & easy meal. 

All you need is :-
1. Tortilla Wraps
2. Salmon (I deep fried them with flour, salt, pepper)
3. Cheese (of any kind)
4. Avocado (Diced it, sliced it, your choice)
5. Sauces (I used Malaysian Chili sauce & BBQ sauce)
Arranged them to you liking. Don't fill up the whole tortilla with the filling, unless you want it to be an opened tortilla style, but I just put some in the middle, drizzle them sauces so I can wrapped it tight.

Then put them wraps in the microwave & used the defrost button for 30 secs & the tortilla wraps should feel warm & soft. Or use the auto heat for 10 secs or more. I just like to use the defrost method so I know I won't cook the salmon/avocado filling, but just reheating the tortillas. 

Once heated, cut into half & get your favorite DVD movie & enjoy the satisfying comfort meal. Blessed & bliss. :)

Comfort food with some-what healthy fillings.
Or try them with Tuna Mayo in can. I love using the Ayam Brand's brand.